How to use a recipe#
Each recipe is a complete config.jsonc. Try one without touching your own config by passing it with -c, then copy the parts you like into your file:
curl -fsSLO https://fastfetch.dev/downloads/recipes/os-age.jsonc
fastfetch -c os-age.jsonc
Your own config lives at ~/.config/fastfetch/config.jsonc (Windows: %USERPROFILE%\.config\fastfetch\config.jsonc). If you don't have one yet, fastfetch --gen-config creates it. The configuration guide explains the file's structure. Every recipe starts with a $schema line, so editors such as VS Code check your edits as you type.
Hide your IP address#
The default output includes a Local IP line, for example Local IP (eth0): 192.168.1.20/24. That's your address on your home or office network, not your public internet address. It's still worth removing before you post a screenshot. Three ways, all tested:
For one run#
fastfetch --structure-disabled localipThis prints the default modules minus Local IP. It's handy for a quick screenshot (--structure-disabled needs fastfetch 2.58.0 or newer).
Permanently: leave it out of your config#
If your config has a modules list, delete the "localip" line. If it doesn't, you're using the default list. This recipe is that default list without localip:
// The default module list of fastfetch 2.70.0, without "localip".
// Generate your own copy with `fastfetch --gen-config`, then delete the "localip" line.
{
  "$schema": "https://github.com/fastfetch-cli/fastfetch/raw/dev/doc/json_schema.json",
  "modules": [
    "title", "separator", "os", "host", "kernel", "uptime", "packages", "shell",
    "display", "de", "wm", "wmtheme", "theme", "icons", "font", "cursor",
    "terminal", "terminalfont", "cpu", "gpu", "memory", "swap", "disk",
    "battery", "poweradapter", "locale", "break", "colors"
  ]
}Keep the line, hide the address#
// Keep the Local IP line but show only the interface name, not the address.
{
  "$schema": "https://github.com/fastfetch-cli/fastfetch/raw/dev/doc/json_schema.json",
  "logo": { "type": "none" },
  "modules": [
    "os",
    { "type": "localip", "key": "Network", "format": "{ifname}, address hidden" }
  ]
}The output shows only which network interface is in use:
| System | Output |
|---|---|
| Linux | Network: eth0, address hidden |
| macOS | Network: en0, address hidden |
| Windows | Network: Ethernet 3, address hidden |
publicip module, which asks ipinfo.io for it. It's not in the default output. The bundled presets all, ci and archey and several numbered examples do include it, so check before you share a screenshot of one of those.Show how old your OS install is#
fastfetch has no "install date" module, but the Disk module can print when a filesystem was created, which for / is usually when you installed the system. The format placeholders {days} and {create-time} do the work:
// "OS Age": how long ago the root filesystem was created, which is usually the install date.
// macOS recreates "/" on every update, so the official example 25 reads /System/Volumes/VM there instead.
{
  "$schema": "https://github.com/fastfetch-cli/fastfetch/raw/dev/doc/json_schema.json",
  "logo": { "type": "none" },
  "modules": [
    "os",
    {
      "condition": { "!system": "macOS" },
      "type": "disk",
      "key": "OS Age",
      "folders": "/",
      "format": "{days} days (installed {create-time:10})"
    },
    {
      "condition": { "system": "macOS" },
      "type": "disk",
      "key": "OS Age",
      "folders": "/System/Volumes/VM",
      "format": "{days} days (installed {create-time:10})"
    }
  ]
}Real output from our three runners:
| System | Output |
|---|---|
| Ubuntu 24.04 | OS Age: 12 days (installed 2026-10-21) |
| macOS 26 | OS Age: 49 days (installed 2026-09-14) |
| Windows Server 2025 | OS Age: 8 days (installed 2026-10-25) |
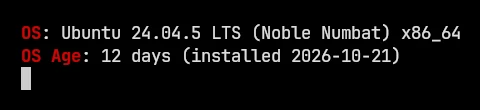
Why the two Disk entries? On macOS the system volume / is replaced on every update, so its creation date is the last update, not the install. fastfetch's own example config (examples/25) reads /System/Volumes/VM there instead, and the condition blocks pick the right entry for each system. On Windows, / means the system drive.
The date is when the filesystem was created. If you restored a disk image or reinstalled without reformatting, it shows that event instead. Some popular configs use a shell command that reads the first line of /var/log/pacman.log (Arch) for the same purpose. The built-in way above needs no shell command and works on every system.
CPU and GPU temperature#
Temperatures are off by default because reading sensors takes extra time. Turn them on per module:
// CPU, GPU and battery temperatures. Off by default because reading sensors is slower.
{
  "$schema": "https://github.com/fastfetch-cli/fastfetch/raw/dev/doc/json_schema.json",
  "display": { "temp": { "unit": "C", "ndigits": 0 } },
  "logo": { "type": "none" },
  "modules": [
    { "type": "cpu", "temp": true },
    { "type": "gpu", "temp": true },
    { "type": "battery", "temp": true }
  ]
}The value appears after the CPU or GPU name. "unit" takes "C", "F" or "K", and "ndigits" sets the decimal places. The display.temp.color settings let you color values by threshold.
fastfetch -c temperatures.jsonc --show-errors to see why.Change the colors#
// Change the colors of keys, the title, the separator and the values.
// Any color accepts a name ("cyan"), an ANSI code ("38;5;214"), "@214" (256-color) or "#RRGGBB".
{
  "$schema": "https://github.com/fastfetch-cli/fastfetch/raw/dev/doc/json_schema.json",
  "display": {
    "color": {
      "keys": "cyan",
      "title": "bold_magenta",
      "separator": "light_black",
      "output": "#e5e9f0"
    }
  },
  "modules": [
    "title", "separator", "os", "kernel", "uptime", "packages", "shell",
    { "type": "memory", "keyColor": "yellow" },
    { "type": "disk", "keyColor": "yellow" },
    "break", "colors"
  ]
}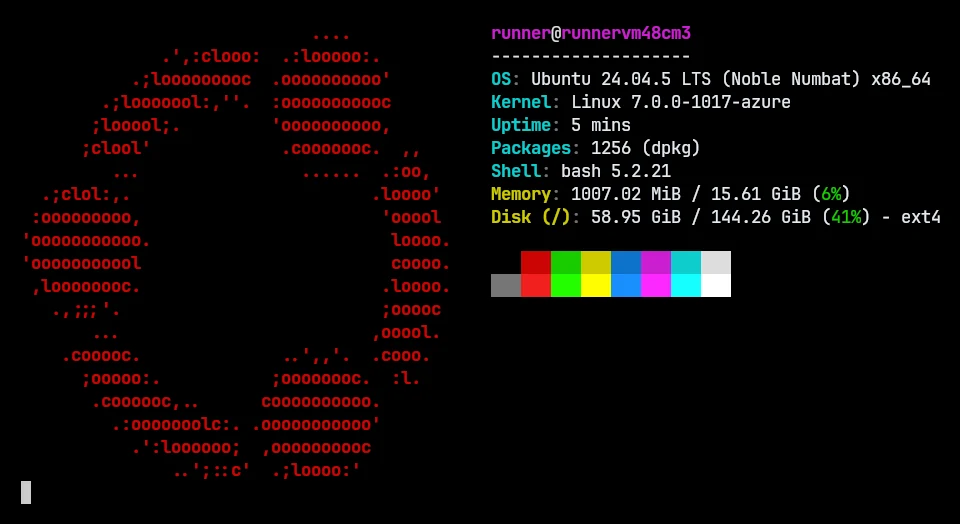
display.color sets colors for the whole output: keys, title, separator and output (the values). A module's own keyColor overrides it, which is how Memory and Disk are yellow here. Every color setting accepts the same formats:
| Format | Example | Meaning |
|---|---|---|
| Name | cyan, bold_magenta, light_black | The terminal's own palette colors, so they follow your terminal theme |
| Hex | #e5e9f0, #f00 | An exact 24-bit color (since 2.42.0). Our test confirmed #e5e9f0 arrives as the escape code 38;2;229;233;240 |
| 256-color | @214 | Color 214 of the xterm 256-color palette (since 2.57.0) |
| ANSI code | 38;5;214, 4;92 | Raw SGR codes, for underline, blink, backgrounds and so on |
Names can be combined with prefixes such as bold_, dim_, italic_ or underline_. There's no background prefix; write the ANSI code instead (44 is a blue background). Logo colors work the same way: "logo": {"color": {"1": "#cba6f7"}} in the config, or --logo-color-1 '#cba6f7' on the command line. We tested that flag, and the hex color reached the terminal unchanged. For complete palettes, see the color themes.
A smaller, minimal fetch#
// A short fetch: small logo, seven lines.
{
  "$schema": "https://github.com/fastfetch-cli/fastfetch/raw/dev/doc/json_schema.json",
  "logo": { "type": "small" },
  "display": { "separator": "  " },
  "modules": [
    "title",
    { "type": "os", "key": "os", "format": "{pretty-name}" },
    { "type": "kernel", "key": "kernel", "format": "{release}" },
    { "type": "uptime", "key": "uptime" },
    { "type": "packages", "key": "pkgs" },
    { "type": "shell", "key": "shell", "format": "{pretty-name}" },
    { "type": "memory", "key": "memory", "format": "{used} / {total}" }
  ]
}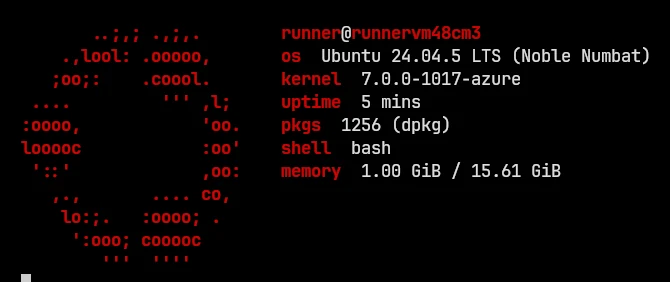
Three things make it short:
- The small logo (
"type": "small"). - Seven modules instead of the default 29.
formatstrings that drop details, for example{pretty-name}on the OS line leaves out the architecture.
Lowercase keys and a two-space separator give it the clean look. Each module's available placeholders are listed on the modules page.
Nerd Font icons instead of text keys#
// Nerd Font icons instead of text keys. Needs a terminal font from nerdfonts.com.
{
  "$schema": "https://github.com/fastfetch-cli/fastfetch/raw/dev/doc/json_schema.json",
  "display": { "key": { "type": "both" }, "separator": "  " },
  "modules": [
    "title", "separator", "os", "host", "kernel", "uptime", "packages",
    "shell", "terminal", "cpu", "gpu", "memory", "disk", "break", "colors"
  ]
}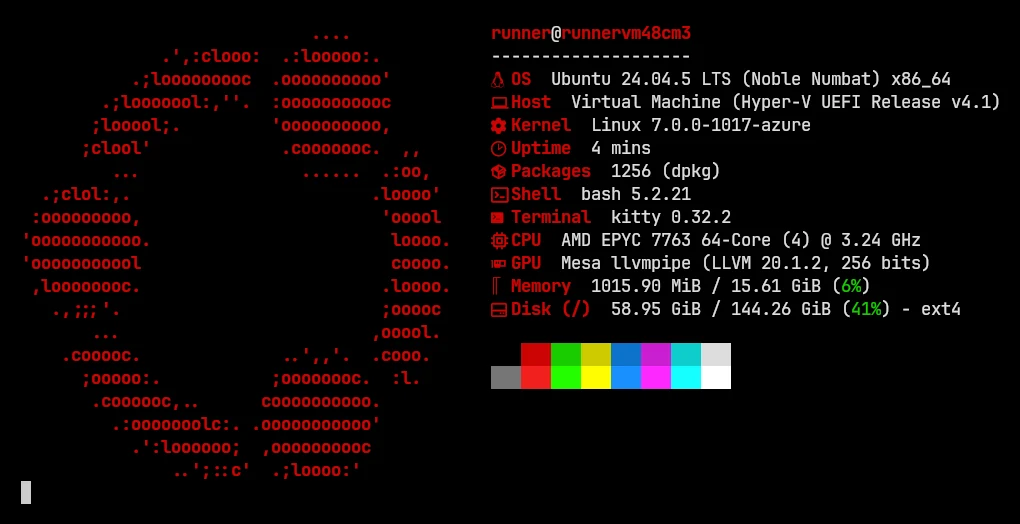
display.key.type controls what goes in front of each value:
"string"(the default): the text key."icon": only fastfetch's built-in icon for that module."both": icon and text, as above."both-0"to"both-4"set the number of spaces between them."none": no keys at all.
The icons are Nerd Font glyphs, so your terminal must use a font from nerdfonts.com. Without one you'll see empty boxes or question marks. Our screenshot used the "Symbols Nerd Font" as a fallback next to JetBrains Mono. To change one module's icon, set its keyIcon.
Boxes and separators#
// Draw a box around the keys. {$1} expands to the first entry of display.constants.
{
  "$schema": "https://github.com/fastfetch-cli/fastfetch/raw/dev/doc/json_schema.json",
  "display": {
    "separator": " ",
    "constants": ["│"]
  },
  "modules": [
    { "type": "custom", "format": "┌──────────┐" },
    { "type": "os", "key": "{$1} OS       {$1}" },
    { "type": "kernel", "key": "{$1} Kernel   {$1}" },
    { "type": "uptime", "key": "{$1} Uptime   {$1}" },
    { "type": "packages", "key": "{$1} Packages {$1}" },
    { "type": "shell", "key": "{$1} Shell    {$1}" },
    { "type": "cpu", "key": "{$1} CPU      {$1}" },
    { "type": "memory", "key": "{$1} Memory   {$1}" },
    { "type": "custom", "format": "└──────────┘" }
  ]
}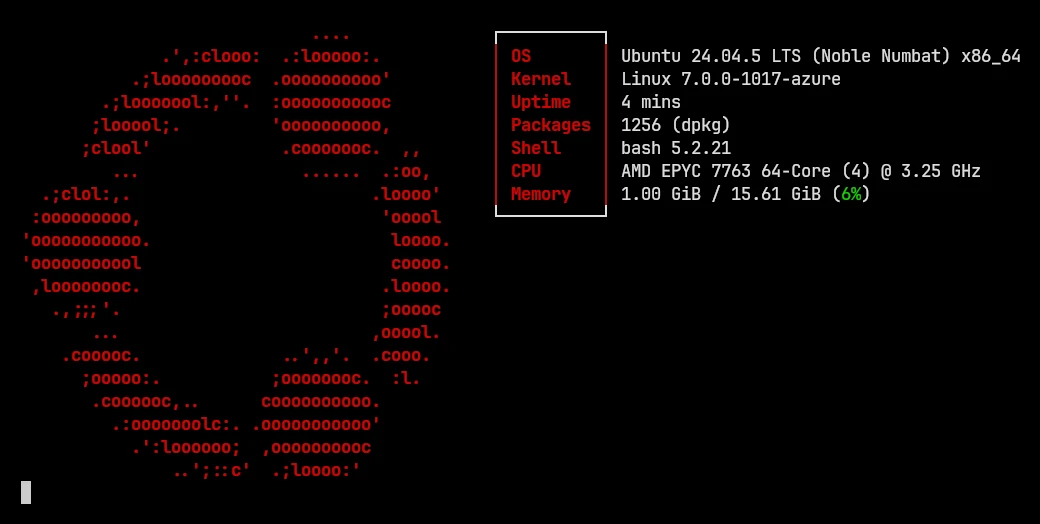
Two features make boxes possible:
custommodules print fixed text: the top and bottom borders here.display.constantsholds strings you reuse in keys or formats as{$1},{$2}and so on. Here{$1}is the vertical bar.
Pad every key to the same width, or the right border won't line up. Many of fastfetch's bundled examples (2, 6, 10, 12, 24, 25, 26 and others) use box-drawing characters in more elaborate layouts; browse them on the presets page.
Rename keys and line up the values#
// Rename keys and line the values up.
{
  "$schema": "https://github.com/fastfetch-cli/fastfetch/raw/dev/doc/json_schema.json",
  "logo": { "type": "none" },
  "display": { "key": { "width": 12 } },
  "modules": [
    { "type": "os", "key": "Distro" },
    { "type": "kernel", "key": "Kernel" },
    { "type": "uptime", "key": "Up for" },
    { "type": "cpu", "key": "Processor" },
    { "type": "memory", "key": "RAM" },
    { "type": "disk", "key": "Storage" }
  ]
}Distro: Ubuntu 24.04.5 LTS (Noble Numbat) x86_64 Kernel: Linux 7.0.0-1017-azure Up for: 38 seconds Processor: AMD EPYC 9V74 80-Core (4) @ 3.70 GHz RAM: 1.01 GiB / 15.61 GiB (6%) Storage: 58.83 GiB / 144.26 GiB (41%) - ext4
"key" replaces a module's label. display.key.width pads every key to the same width, so the values start in one column; set it a bit wider than your longest key. On the Windows runner, the Disk module printed two "Storage" lines, one per drive (C: and D:). Disk shows every mounted volume unless you limit it with "folders", as the OS age recipe does.
Usage bars for memory and disk#
// Show memory, swap and disk usage as bars next to the percentage.
{
  "$schema": "https://github.com/fastfetch-cli/fastfetch/raw/dev/doc/json_schema.json",
  "logo": { "type": "none" },
  "display": {
    "percent": { "type": ["bar", "num"] },
    "bar": { "width": 16, "char": { "elapsed": "■", "total": "·" } }
  },
  "modules": ["memory", "swap", "disk"]
}
display.percent.type takes a list of flags:
"num": the percentage."bar": the bar."num-color": colors the number by threshold (the default does this)."bar-monochrome": a bar in a single color."hide-others": hides the used/total sizes.
display.bar sets the width and the characters. The color thresholds are set per module: "percent": {"green": 50, "yellow": 80} on Memory or Disk means green below 50 %, yellow up to 80 % and red above. Those are the defaults for both modules.
Make it look like Neofetch#
fastfetch -c neofetch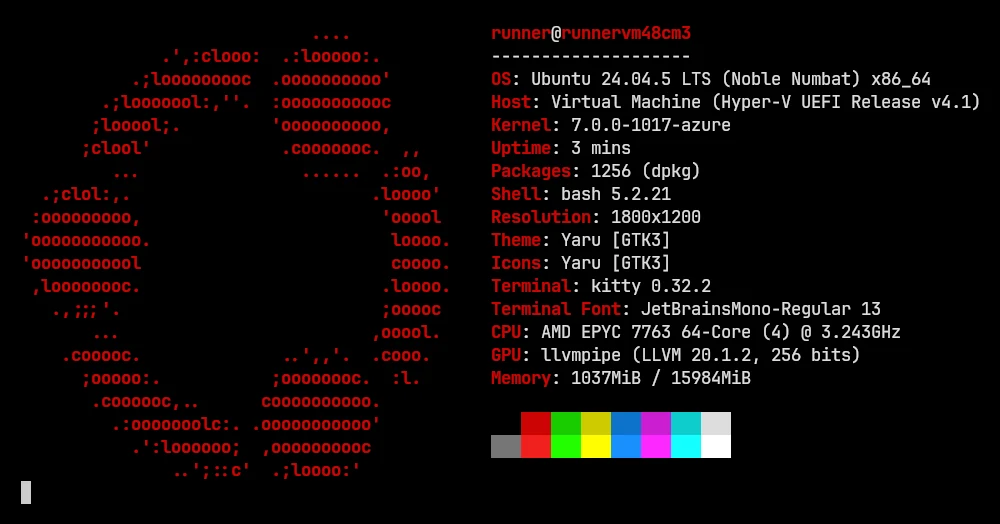
fastfetch ships a preset that copies Neofetch's module list and layout. To adjust it, copy the preset file into your own config: fastfetch --list-data-paths shows the folders that hold the presets. The Neofetch migration guide covers the differences that remain.
Show or hide modules#
fastfetch --list-modules                       # every module name
fastfetch -s os:kernel:cpu:gpu:memory          # only these, in this order
fastfetch --structure-disabled gpu:disk        # the usual list minus these
Those flags work for one run. To make the change permanent, edit the modules list in your config: delete a line to hide a module, or add a name to show one. The order of the list is the order of the output. "break" inserts an empty line, and "colors" draws the color blocks.
Test without your config#
fastfetch -c none-c none skips your config file for one run, so you see fastfetch's defaults. It's handy when you're not sure whether a problem comes from your config. In our tests a config with a single module printed 1 line, and the same command with -c none printed the full default output (22 to 26 lines, depending on the system).
Questions#
Does fastfetch show my public IP address?
Not by default. The default output shows your local network address (Local IP). The public address only appears if you add the publicip module, or use a preset that includes it, such as all or ci.
How do I show my OS install date in fastfetch?
Use a Disk module for / with the format {days} days (installed {create-time:10}). On macOS point it at /System/Volumes/VM. Full config.
Why are my icons shown as boxes?
Your terminal font isn't a Nerd Font. Install one from nerdfonts.com and select it in your terminal's settings, or set display.key.type back to "string".
How do I change the color of the keys?
Set "display": {"color": {"keys": "cyan"}}, or per module with "keyColor". Colors can be names, #RRGGBB, @0–@255 or ANSI codes. Details.
Where do these files go?
Save one as ~/.config/fastfetch/config.jsonc to use it every time, or keep it anywhere and run fastfetch -c path/to/file.jsonc.